Tuesday, 10 November 2015

Visual Storytelling with Book Creator - Conflict Stories


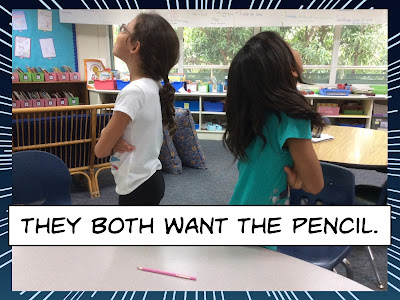
Today in Grade 2 we made Conflict Stories using the new comic tools in Book Creator on our iPads. The students were able to take examples from small conflicts that they had experienced in the classroom.

Outline

The outline was - Title - Beginning - Problem - Conflict - Solution. The class has been learning about conflict resolution as a unit of work. Using Book Creator, every student was able to take a conflict and easily turn it into an illustrated story within a lesson.

Design

As a part of the design, we learned about the Law of Thirds for the cover of the book and to use facial expressions to help tell the story. The students also learned about choosing fonts that are easy to read and colours that contrast well with the backgrounds. We also learned the difference between speech bubbles and thought bubbles.

The students really enjoyed working in small groups to act out each conflict theme. Most of the themes were about sharing. It is really easy for students to quickly build a story that draws together photos with text to support the storytelling.

Next Steps

Our next steps will be to finish the stories by creating voice recordings and then exporting the finished work as a video to upload to our blogs.
Title - Cover of Book
The Beginning
The Problem
The Conflict
The Solution

Monday, 9 November 2015

Makerspace - Electric Textiles

I am a Maker. I love all kinds of arts and crafts and so I have developed a lot of skills through my making. I am a curious person so in order to make sense of how a Makerspace may be best utilized in a school, I needed to explore some projects myself.

I love textiles. I can weave, sew, knit, crochet, knot and print and paint on textiles. My next challenge is to learn how to embed technology into my textiles. I am also curious to learn more about this to encourage more girls to work on Makerspace projects, although these kinds of projects could be also of interest to boys. Instead of a flower, you could make a robot.

Just last weekend I tried to create a circuit in fabric. One of the greatest challenges here in Jakarta is finding the resources needed for these types of projects. I decided to start with a simple circuit that requires using a coin battery, battery holder, a switch and some LEDs.


I was able to buy some conductive thread and some tiny LEDs. The first thing I did was test the LEDs with the thread and battery. I was not able to buy a battery holder for the coin battery. I know that using a AA battery is not a good idea as the power could burn out the little LEDs. I decided to break open an old toy to get the battery holder and it worked just fine.

Equipment Needed:
felt - various colours
sewing thread
needle
conductive thread
needle nose pliers
LEDs
3V coin battery
Battery holder
metal press stud clasp

Sew your felt picture. You can do this by hand or on a sewing machine. You could even just glue the felt together with fabric glue. Next check all your electric parts.


Check the positive side and negative side of the battery. Put the battery into the holder so that the wire brackets touch the matching + or - Note that the positive side also runs around the edges.


The LED has a long and short side. The long side indicates the positive.


Bend the wire on the LED to make a little loop to sew through. Simple pointed pliers will do.
Here is the bent LED ready for sewing.


Test your LED, thread and battery to make sure it works. Make sure you connect the thread securely to your battery case. I placed it under the small screws and tightened them.


Next you can start sewing the circuit.


It's a good idea for students to draw a diagram for their circuit to work out where the positive and negative connections will be sewn. This diagram is showing that placement for just one light. The other lights can connect to the circuit. They don't have to go all the way back to the battery.
Use the metal snaps as a switch. Make sure that you sew the positive connections but leave one break for the switch. This will allow you to switch your lights on and off.


Here is the finished project. 

Thursday, 27 August 2015

How to Get Your Signature on Your Email using Preview on a Macbook

Have you ever wondered how to get a hand drawn signature on your email? You can do this using the Preview app. For this tutorial I have used capturing your signature that you have written on a piece of white paper using the Macbook iSight camera.

Before we start, please update your Macbook to the latest version of Yosemite 10.10.5


Monday, 11 May 2015

Digital Citizenship. How Can We Say 'Thank You'


I am keen to act upon a recent recommendation to further develop digital citizenship practices at PIE. I must admit I have been focusing on the iPad roll out this year so this dropped off my radar.

Looking to next academic year, I would like to put some good practice into place. One of the biggest challenges is not only developing understandings about good Digital Citizenship practices but to sustain those good practices.

I have always believed in authentic experiences last the longest so I need an approach that would reflect this. Ongoing discussion is key.
Living in Indonesia it can be difficult to maintain the right perspective. You can readily buy pirated CDs at most shopping centres. Our students have difficulty in learning that just because you can access media, doesn't mean that you should take it and use it. Just because you bought a pirate CD or grabbed a resource online, doesn't mean that you can ethically use the contents. Some kids think that because they 'paid' for it (paid = spent $1 for the pirated copy) or found it themselves online - it's OK to use.

My message to students is citing information and media is like saying thank you to the one who made it. When someone does something for you, it's good manners to say thank you. Here is a way to say 'thank you'.

I am mostly working with the younger grades so I need some visuals to help bring the message and to give the class teacher a resource that they can refer to often. I have started working on some Info Graphic posters to be copied and put up in the classrooms. It is helping me that the current theme in Grade 4 is one of Digital Citizenship. I have been involved in talks with classes and from that I have a better perspective of the current situation.

I have made a start with posters for the younger grades. Take a look. I hope to build on this and level it up for older students. My first 3 are Recording Resources, Safe Information Searches and Safe Picture searches. I am looking for easy to follow accessible information. These posters will help classroom teachers get the message across and help them to remember what to do.

Monday, 9 March 2015

Virtual Reality in Learning - a Possible Makerspace Activity

I have been having some fun recently trying my hand at making a VR viewer. This came about from a request from a student. In one of the classes in iTime, some students were investigating about Buchanan Castle in Scotland. This came about because one of the students is a Buchanan and was curious about her family's castle.

My first thoughts went to that immersive experience that you can have when using Google Maps Street view. As I had been researching VR Google Cardboard, I thought - 'Why not put the two together?'

I did some research about it and found out that you can order Google Cardboard here. Only problem with that is I am in Indonesia and the postal service is not only slow but often you can be charged a huge tax on delivered items. And I needed that thing now - not in a month's time.

So, then I searched some more and discovered that you can make your own using some lenses from cheap binoculars. I found a video all about it on You Tube below.


And here is a great resource here on Instructables.

I have an iPhone 6+ so the online templates didn't really fit my phone. You can get the idea from looking at the parts so it was easy to make my own. I found this great black plastic cardboard in the local stationary shop which makes the whole experience more immersive.

Here is my attempt. It would work better if the lenses were actually 45mm focal point. The toy binoculars were not as good as I had hoped. It does work a little bit though but you still get split panels either side of the image.

So you're probably wondering what apps go with this. The best one is 360Cities. You can view ones that other people have made just by going to the page via Safari. Look here below. You need to tap the view symbol (looks like glasses) to see it in double screen.


Here are all the apps that I like to use with VR Googles for Education:

Google Maps https://itunes.apple.com/au/app/google-maps/id585027354?mt=8
JurassicVirtual Reality https://itunes.apple.com/au/app/jurassic-virtual-reality-vr/id958174054?mt=8
360Cities https://itunes.apple.com/au/app/panorama-360-cities/id581473726?mt=8

Or for those who are curious - create your own VR experience here.

Tuesday, 10 February 2015

Mini Documentaries in Grade 2

I have been wondering for some time if it was possible to teach documentary movie making skills to young students. With an iPad app such as iMovie it has been made very easy to create and edit a video. The focus here is not to just make a movie but to have students communicate specific content and to document their individual learning.

Up until this point the students have used the movie camera with Book Creator to create a movie and all students are very familiar with the story writing process.

My question here is:
Can you teach specific movie making skills without it becoming too complex for the age level of the learner?
To start the lesson I talked about how a movie is just like a story. It has a beginning - middle and an ending.

The beginning part will introduce the movie. It can be a question or a statement.
The middle part will show the process. You may wish to include photos that show plans as well.
The ending will show what was learned. It may also include any feedback from peers or the teacher.
On your iPad you can use the camera inside the iMovie app to capture the question and your comments regarding what you learned. The plans and process can be shown either as photos or small clips.

Step 1: Ask your students to prepare the photos, clips and other documents required to show the process.
Step 2: Create a poster that shows the hypothesis if your documentary is about an inquiry. This can be easily created in Pic Collage or another app and exported to the Camera Roll.
In iMovie on your iPad, choose New Project - Movie
Choose and simple theme that fits with your subject matter.
You can video record yourself asking the opening question and then again reflecting on the learning process at the end.


Friday, 6 February 2015

1 to 1 iPads - How is it going after 6 months

At my current school there are 1:1 iPads in grades 2-4. This program is a new one. The previous academic year only Grade 3 had iPads as a pilot project.

In Grade 1 there are shared iPads. The ratio is 3:1.

What I have learned so far ...

Make the focus a creation one. iPads can really help teachers to make the learning experience more personalized. In a busy classroom there is not always enough time for each student to take a turn to read aloud or to verbalize their learning. A well used iPad can give this opportunity. To start with the focus was all on documenting the learning. This meant that students were able to record their thoughts about their reading or their Math. This work was collated into a book using Book Creator. It was an easy way for teachers to use the iPads on a more independent level as the app itself is really intuitive.

As the Digital Literacy Coach, my role is to provide timely and ongoing support to class teachers as they use iPads in their classrooms.

Now that we have settled into the program, I am able to stop and reflect as to how it is going.

What Has Worked

The iPads make it very easy for the students to record their learning as it develops. I feel that through using apps such as Book Creator with the inbuilt camera, the students are easily able to record their reflections, their read-aloud and even their inquiries on the fly. The addition of headsets with a hands-free mic has been essential to help improve the quality of these recordings. I have found too as a coach that if I am located near the classrooms where I can be seen in plain sight, I get more buy-in from the teachers. Quite often teachers will simply see me sitting there and remember an issue or a need that they may have. It works well as this will often lead to a booked session where I can work in the classroom to help with the transfer of skills. It's a sure fire way to get a fully booked day.

Now that the corner has been turned, I have found that the projects produced on the iPad have become more varied. The students have a wider skill set so they are able to make suggestions as to how they might go about showing their learning. Students are started to suggest how they can show what they know. On the whole the students are far more independent to use the iPads.

I have also found that in some classes this development has pushed learning new skills that I previously thought would be too complicated for this age group. It's wonderful to watch new ways to communicate learning being constructed as the program grows. Initially it was all about just documenting, now the focus has become more about learning instructional design to improve the quality of that communication.

What has been difficult

In Grade 1 things have been moving a lot slower. I believe that this is a direct result of having to share the iPads between 3 students. I think that this ratio makes the timing very clumsy and quite difficult. On a given day, the students would need about 20 minutes to work on a project. With the current sharing of one between three, it makes that very hard to juggle as you can't continue to run an inquiry for too long just so each child can get enough time to create their work. This means that a simple project will run across several days which makes the whole management of it very difficult. If a child is absent, then that can add a whole new layer of frustration. I want to advocate for at least a 2:1 share as a minimum or you can't really expect too much.

In Kindergarten there is one set of iPads for everyone to share. This is probably enough as it is used as a centre but there needs to be a better way to push off the finished products. Airdrop takes time and can be very slow. There needs to be a way for better/faster transfer before this iPad program can really move forward.

Upper Grades

As the students become more familiar with their iPads, it becomes more and more like a window into their learning. In the upper grades the students have a website each which helps with transferring their work on a regular basis. This is a huge step up. Personally I think that it is very important that the work is pushed off frequently. I would like to see a similar solution in the younger grades that is somewhat like Blogger Jr. I am looking for a journal-type solution that shows growth.

What I can do to improve

I try hard to lead by example. I want to be able to continue doing this. I think that now students are needing more resources for their inquiries I need to create an online guide for this just for the younger grades. I know that there is a portal for the library but I think I could make it more accessible.
I also want to find some other options for sharing. I am quite happy with all the QR coding that is happening via Dragontales (school repository) and I want to continue to build upon that. I look forward to getting some iBeacons as I can see how these could be used for accessing resources more easily. I also wonder about better ways for instructional design. I have been doing some work with this but perhaps I need to create some workshops on it for the future.

I'm also looking forward to implementing Makerspaces to support current learning.


Tuesday, 27 January 2015

Character Study with Morfo and Drawing Pad on iPads

In Grade 2 all of the students have been writing character descriptions. This process has been teaching them to look beyond physical attributes and to learn about different aspects that influence a particular character.

In Grade 2 there is a new 1:1 iPad program this year. In the past these character descriptions would be written up and displayed on paper. By using iPads, students are able to make their characters come alive. To do this they combined two apps called Drawing Pad and Morfo.

Drawing Pad https://itunes.apple.com/us/app/drawing-pad/id358207332?mt=8 is one of my go-to apps on the iPad. It is easy to use and you can make beautiful artwork with just a little knowledge. To draw a character portrait all your need to do is follow these simple steps below:

Here is the actual character from Ruby's Wish.


Step 1: Paint the basic shape for the character. This is the head, hair and shoulders. Add a black background using the paper backgrounds and outline the hair using a pencil. Keep it simple. There is no need to add eyes or a nose as the Morfo app will do that for you.

Step 2: Add the rosy cheeks

Step 3: Use the smudge tool to smudge the red spot.


Step 4: Add some pencil details in the ears and on the clothing. You may wish to add a pink mouth as well but Morfo will make a mouth. Save your work to the camera roll by tapping the share icon.


Open the Morfo app https://itunes.apple.com/us/app/morfo-3d-face-booth/id440560166?mt=8
Follow the instructions. Grab your script and breathe some life into your character. Take a look at the finished Ruby. This was created by a student from Grade 2.


3D Printing with Grade 4 at JIS

3D printing is rapidly evolving and becoming more affordable and easier to do. I have been reading up on the subject and I am very curious about how this can be applied in the Elementary classroom.

The book that I am reading is called 'Fabricated' by Hod Lipson & Melba Kurman. It covers many uses for 3D printing from household to medical to even printed food that can be eaten!

I was excited to learn that one of my favourite apps - Trimble Sketch Up has a template for 3D printing. This is a great free program that is easy to use.  I worked with a small group of students from Grade 4 for extension Math. 

To start the lesson I asked the students what they already knew about 3D printing. Some students knew a lot. They knew that you can print edible food, print a car and even print models created in Minecraft.

Next I asked them if they would be interested in making something to be printed. Well, the reaction was of high excitement!

So, onto SketchUp. In advance I had already downloaded and installed this free program on some laptops from the school cart. There is no version of SketchUp for iPad, so the students would need to use a laptop for this task.

Inside SketchUp, there is a special template for 3D printing.You must keep your object within the box as this is the printable size for most 3D printers. I gave the students a lesson on how to create a 3D object using the Push/Pull tool and then asked them to create the first letter in their name. Some students were really quick so I asked them to look at the symmetry and make sure that their letter was properly balanced.


Here is a screenshot of an 'A' created by one of the students. The next job was to Airdrop it to me so that I could further prepare the file for printing.


To prepare the file, I had to export it as an .STL file. This is the file type for 3D printing. It is a good idea to have that exported file checked for errors. In order for a 3D file to be printed, all the surfaces must close properly around the shape. If there are any holes, it will not print. After some research, I learned that there is a free cloud service that actually checks and repairs your file for you. That service is called NettFab. All you do is create an account, upload the .STL file and it will repair it for you. When the file is finished, you just download it ready to use.

Now that I had all the prepared files, I needed to book a time for the 3D printer which is located in the Design Technology classroom in our High School. The teacher there was very kind and helpful. He made a further conversion of our files as the printer requires each file to be put through a program first. This conversion essentially turns each model into layers ready for the printer to process. 

On Monday we all walked up to the High School to see the printer in action. Luckily when we arrived, one of the files - this letter A was already in the middle of being printed. It takes over an hour for a 7cm letter to be printed! The printer is already 2 years old and I have read that the new printers are much faster. Here is a film that I made of the printer in action.