Wednesday, 20 January 2016

Making Simple Paper Circuits

Today in Grade 2 we tried to answer a student question:

"How does a battery light up a light?"

We did this by exploring simple circuits. The students used copper tape, sticker LEDs and a button battery.  First we had a talk about batteries. The students were given a button battery to try to find the positive and negative sides.

We made a connection to how we use batteries in our toys. The students had a lot to say about how important it is to get the + and the - the correct way around. Next we used a template. This can make it easier for beginners as this was our first time to make a circuit. We used copper tape for the wires.


The copper tape can be bought online or at a hardware shop. It is best to use narrow tape for beginners as it will go around a corner more easily. If it is a young child, be aware that the edges of the tape are sharp and can cause a paper cut.


I made a quick circuit diagram as these learners are beginners. It was easily photocopied and all the students had to do was follow the lines for the tape. You need to note that the lines between the battery and one side of the LED must be strong and continuous. At the LED there is a break. Make sure that there is a little break here at that part between the positive and negative sides.


Put the sticker LED on after you have put down the copper tape.You can add extra copper tape on top if you need to make a stronger connection.


Once your circuit is complete you can add the battery to test your light. If it is not working, add some extra copper tape on the corners and either side of the LED light to help make your circuit stronger.


Here is a video of a finished circuit. The students added a drawing on top which featured a light to light up using their circuit.

Tuesday, 5 January 2016

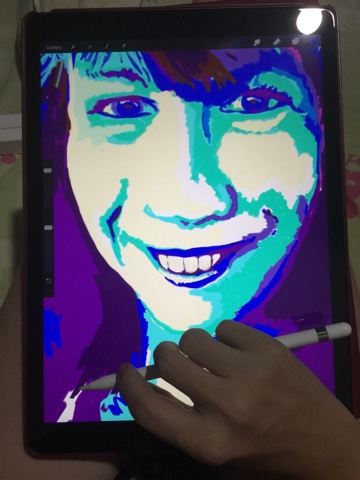
Painter Meets Apple Pencil

I have had an Apple pencil for just under a week and I wanted to share my thoughts. I am a painter. I prefer to paint really large pictures using acrylics (mostly because oils take so long to dry in the tropics) and because the colours are really bright. 

I have had an iPad since they were first released. I have tried sketching with it but honestly I found the screen to be too small. I also hated not being able to rest my hand if I needed to. I have a variety of stylus. I have a fine stylus, a paint brush one and a bunch of regular ones. Not really a fan. I think it's because of the small size of the screen and the feel just didn't match up. I also didn't like not being able to see past the stylus. 

Enter Apple Pencil and iPad Pro

When I first heard about these two I became very interested. I did wonder about how my style of painting would translate. I like to use bold strokes with not much blending. I wondered if I could get the same look. 

That's where I made my first mistake.  Painting on an iPad offers a range of tools that you can't get with regular painting. This is what you should embrace. I am slowly realizing that I need to re-learn how to paint. How to paint with an Apple Pencil. 

I am really liking the experience, but I have a long way to go. 

What I like:
Being able to easily pick colours and store them. If I want I can easily colour pick colours already used. 
Love being able to reposition and resize. 
I like the huge choices of the paint types and being able to app smash different apps. 
Love that I can undo and redo with just a tap. 
Being able to see past the pencil and to be able to hold it like a real pencil (on an angle). 

You are probably wondering why I didn't think of learning to use the smaller iPad for painting? To learn to adapt. To just embrace it. Two reasons, the screen size is just too small and the Apple Pencil really does respond well. It feels much more like the real thing compared to a general stylus. 

I wonder how using these tools will influence my painting style?