Showing posts with label 1:1 iPads. Show all posts

Friday, 28 February 2020

IB Dunia at Global Jaya School

 Today I presented at IB Dunia. I share about Augmented Reality and how you make it. In my workshop taught about how to create interactive augmented reality on an iPad using Apple Reality Composer. It was a pack session and I took a suitcase of iPads from school for participants to use. We also explored Merge Cube together with Tinkercad as older iPads can use this. I wanted to make sure that I offered a number of options for schools with different types of iPads.


I also share about my new book Create Your Own AR Pet


Tuesday, 20 September 2016

Accessibility for Young Learners

We have recently launched Easy Blog Schoolwide this year at JIS Elementary. I am so excited to get this moving. We trialled the app last year in Grade 1 and made the decision to roll out EYP to Grade 4 this academic year. Every child from EYP to Grade 4 now has their own Easy Blog. This is accessed via their iPad. I am a huge fan of the app that has been developed by a group of teachers at the Western Academy of Beijing.

The best part of Easy Blog is that it is visual and very simple to use and it doesn't take up very much time to make a post. Students can post as they are learning. Parents are connected and will get to see learning in real time as it is happening. Parents get a notification each time there is a new post added. They can easily view the blog on their smartphone. This makes it possible for the parent to see their child's learning anywhere, anytime. Over the last couple of weeks, classes have started blogging. The students have been making their first post and creating an avatar for their profile.

Example avatars from a young class made with the Drawing Pad app
Example avatars from an older class made with AvatarMaker.com 

What is really interesting is how the accessibility settings in an iPad can open up so much for young learners and for those needing support as new learners to English. The students are able to add a keyboard in their iPad for their mother tongue. This means that they can dictate and the iPad will type in their language. Being able to work like this in two languages helps learners make important connections. As young learners often struggle with typing, the dictation offers them a way to type quickly and to practice reading back what has just been typed by the iPad to check for errors. This also means that when parents comment in their mother tongue on blog posts, the child can respond in their mother tongue too.

The iPad is able to read aloud comments in different languages, but it does take a bit of setting up. A simpler way for young students to hear comments read aloud in languages other than English, is to capture with another device (their friend's iPad) and let Google Translate read the comment. Once you have used the Google Translate app a couple of times, it becomes more fluent and can translate even faster.

Here is a screenshot of Google Translate capturing the text from a screen. I tap the photo button and take a photo. Then I highlight the Japanese text with my finger to get Google to translate it.


Next, I tap the blue arrow to bring it to this screen where I get a sound button to read the comment aloud in Japanese allowing the young child to hear what has been written. This is so exciting and so accessible. I can't wait to see it develop across the school. Today already I am watching comments being posted from parents in different languages. 


Thursday, 18 August 2016

Dictation on the iPad with Book Creator

Book Creator is one of my go-to apps on the school iPads. I work at an international school with students from all over the world. A great accessibility feature of iPads is the dictation feature in the keyboard.

I have used dictation in Book Creator as a way for young learners to be able to get their thoughts typed up more efficiently. I find it really helpful for young learners to be able to speak aloud their sentences and see them being typed up by the iPad.

Well, did you know that this in-built feature works for languages other than English? In the screenshot below I have used the Indonesian keyboard to access dictation in Indonesian. It works so well! What a fantastic way for students to practice pronunciation. Go on try it now with a language that you can speak ...

Go to Settings - General - Keyboard


Choose any keyboards you wish to make available. 

Now open Book Creator. When you want to dictate, select 'Add Text' from the plus menu. 


When you dictate - click the world icon on the bottom left of the spacebar and select your language. Press the microphone icon and speak your sentence. It's works best if you only dictate short sentences with either a hands free microphone or work in a quiet space.


Tuesday, 10 February 2015

Mini Documentaries in Grade 2

I have been wondering for some time if it was possible to teach documentary movie making skills to young students. With an iPad app such as iMovie it has been made very easy to create and edit a video. The focus here is not to just make a movie but to have students communicate specific content and to document their individual learning.

Up until this point the students have used the movie camera with Book Creator to create a movie and all students are very familiar with the story writing process.

My question here is:
Can you teach specific movie making skills without it becoming too complex for the age level of the learner?
To start the lesson I talked about how a movie is just like a story. It has a beginning - middle and an ending.

The beginning part will introduce the movie. It can be a question or a statement.
The middle part will show the process. You may wish to include photos that show plans as well.
The ending will show what was learned. It may also include any feedback from peers or the teacher.
On your iPad you can use the camera inside the iMovie app to capture the question and your comments regarding what you learned. The plans and process can be shown either as photos or small clips.

Step 1: Ask your students to prepare the photos, clips and other documents required to show the process.
Step 2: Create a poster that shows the hypothesis if your documentary is about an inquiry. This can be easily created in Pic Collage or another app and exported to the Camera Roll.
In iMovie on your iPad, choose New Project - Movie
Choose and simple theme that fits with your subject matter.
You can video record yourself asking the opening question and then again reflecting on the learning process at the end.


Tuesday, 27 January 2015

Character Study with Morfo and Drawing Pad on iPads

In Grade 2 all of the students have been writing character descriptions. This process has been teaching them to look beyond physical attributes and to learn about different aspects that influence a particular character.

In Grade 2 there is a new 1:1 iPad program this year. In the past these character descriptions would be written up and displayed on paper. By using iPads, students are able to make their characters come alive. To do this they combined two apps called Drawing Pad and Morfo.

Drawing Pad https://itunes.apple.com/us/app/drawing-pad/id358207332?mt=8 is one of my go-to apps on the iPad. It is easy to use and you can make beautiful artwork with just a little knowledge. To draw a character portrait all your need to do is follow these simple steps below:

Here is the actual character from Ruby's Wish.


Step 1: Paint the basic shape for the character. This is the head, hair and shoulders. Add a black background using the paper backgrounds and outline the hair using a pencil. Keep it simple. There is no need to add eyes or a nose as the Morfo app will do that for you.

Step 2: Add the rosy cheeks

Step 3: Use the smudge tool to smudge the red spot.


Step 4: Add some pencil details in the ears and on the clothing. You may wish to add a pink mouth as well but Morfo will make a mouth. Save your work to the camera roll by tapping the share icon.


Open the Morfo app https://itunes.apple.com/us/app/morfo-3d-face-booth/id440560166?mt=8
Follow the instructions. Grab your script and breathe some life into your character. Take a look at the finished Ruby. This was created by a student from Grade 2.


Thursday, 20 November 2014

Making Apps in Grade 2 with Tiny Tap

Today I worked with a student to create a simple app using Tiny Tap. This came about because one of the students showed an interest to make an app. He had tried using Tiny Tap before on his own iPad but had not made a game for learning before at school.

I too was new to Tiny Tap.

I made a time through the Homeroom teacher to sit with the student to explore Tiny Tap further. We looked at the example games on the site and play with a few of them to further understand what you could do. We then made an agreement to find out more ourselves and to meet again to create an app.

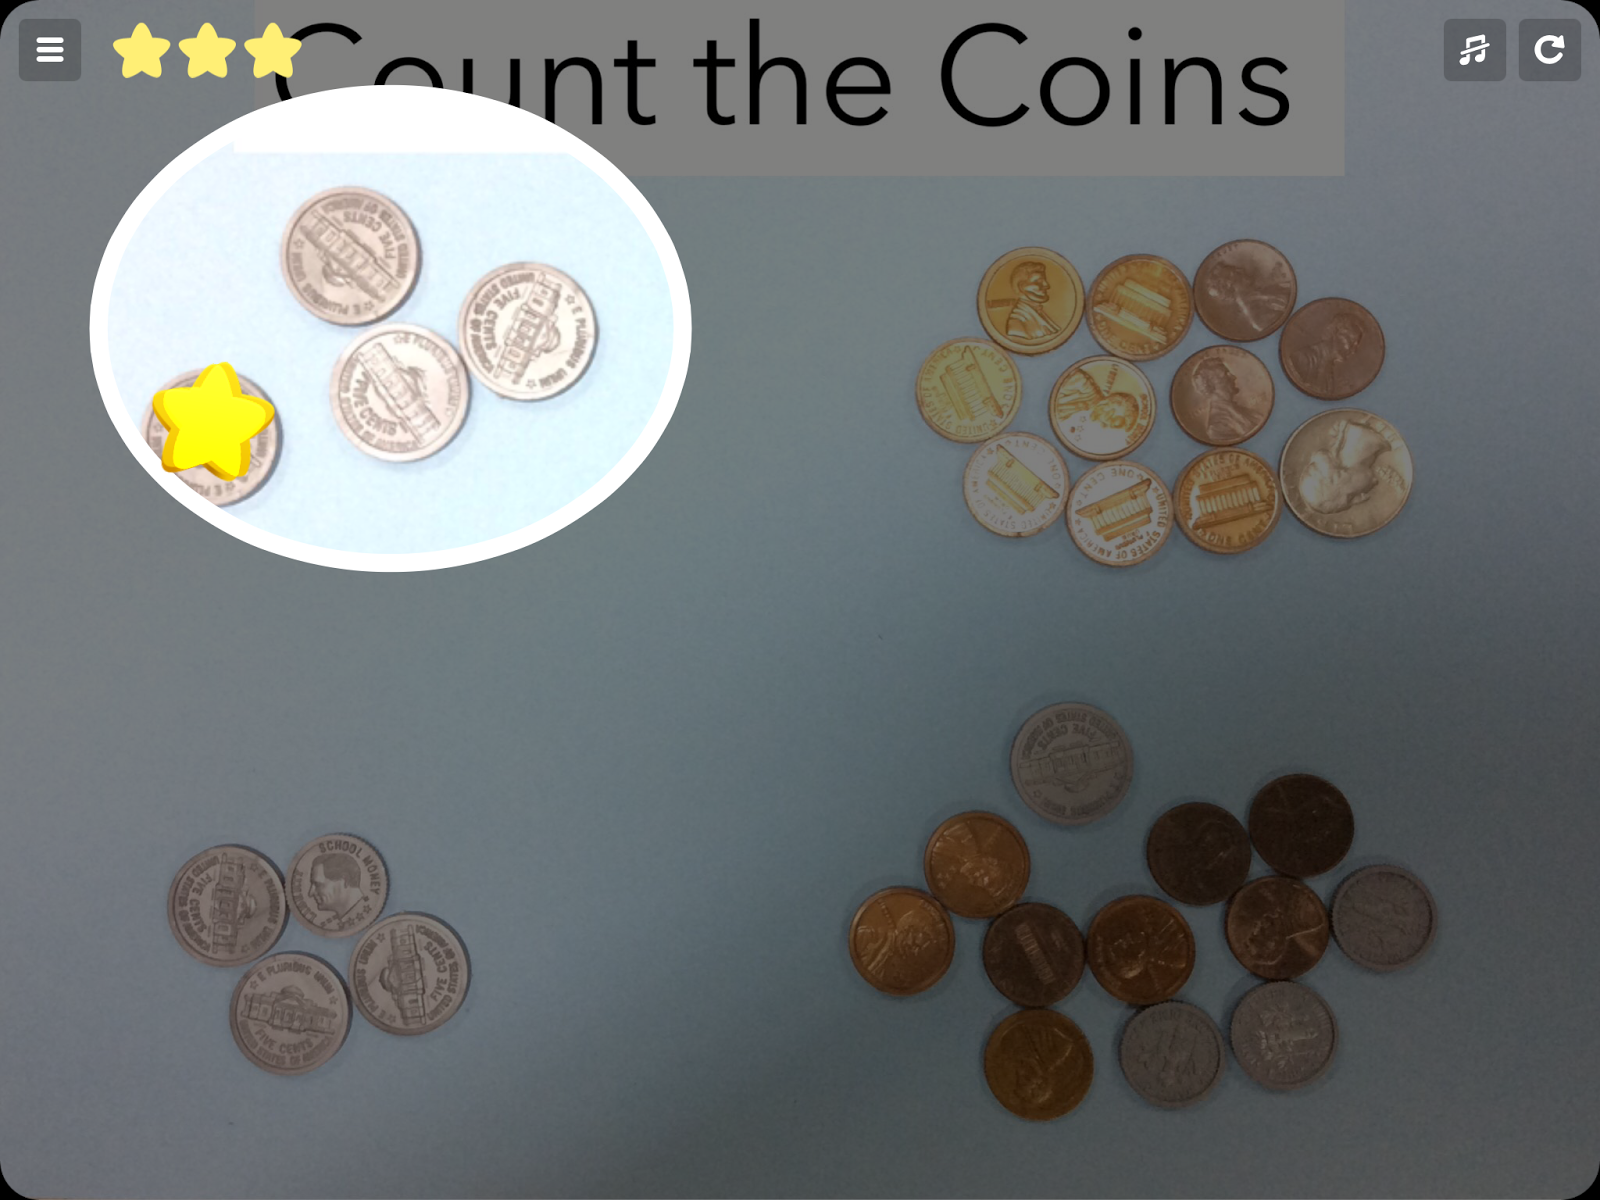
As with all technology use, I like to document the learning or to create something that furthers the learning. The class had been learning a lot about counting money so we decided to create a game about counting coins.

In my mind I mentally went through the steps that would be necessary to create the app. I purposefully wanted to use real items so that the students would be having to count coins to create their different answers.
To make it simple I asked the student to create 4 piles of coins on some colored paper. He then grabbed some scrap paper to write down the total amount for each group of coins. This required counting and checking - good we are practicing the actual skill even whilst creating the app!
Next we had to take a good clear photo of the coins and crop it to tidy it up. Then we opened the app Tiny Tap and started to build it. You simply add the photo and make it the background and add the title using the Text feature.

Finally we added some voice recorded instructions such as 'Tap on the pile of coins that make 43 cents'. When all the instructions had been added the app was saved and uploaded to the Tiny Tap server by the teacher and made private which means that it can't be accessed unless you have the URL. The URL was copied and a QR code created so that it can be scanned at school by other students wanting to try out the app.

Here are some screenshots from the finished app!


Friday, 3 October 2014

My Top Apps for this Week

My top 3 apps for this week have been:

Book Creator - to create Learning Stories

We have started making these. The students all created their own covers and first section which was titled 'About Me'. 

Explain Everything - to create Math Stories

The students learned to create talking, animated Math stories. This was a follow up to their learning in class. It was a very exciting session. The students used the hands-free headphones and mics to record their voice.

Merriam Webster - dictionary with voice recognition


Things I like:

It allows the student to search for words by speaking.

It gives you examples of how the word can be used in a sentence.

The definitions are simple.

It also gives you synonyms and antonyms.

Wednesday, 1 October 2014

iPads in Maths

What does learning with iPads look like?

In a typical Math classroom you will see lots of manipulatives. This is so learners can make connections when handling objects. In an iPad classroom this practice can easily continue. With an iPad, the learner can document that hands on learning in such a dynamic way that can further personalize their learning.

When teachers ask me 'What does iPad learning look like?',  I tell them that it mirrors what happens in the room. Just today, I have been asked to go to a Grade 2 classroom to help consolidate the learning.

Where do you start?

Learning with iPads in the classroom doesn't change the way we learn as much as it personalizes it. Using technology allows the learner to capture what they are understanding as they move up through the different levels of Blooms.

You could argue that iPads can follow the entire learning pathway, but I personally prefer students to have some degree of front loading first that is 'low tech' and less distracting. That analog experience is so important for a young learner.


The current learning in the room is Math stories and learning about how to write a Math equation as short story. Here is an example from a Grade 2 classroom that was created today by a student. The lesson prior to this was all about writing the Math story and drawing a picture. The students had essentially got to the creating level as they had indeed already done some creating on paper with drawings and writing sentences about subtraction. With young learners, it is a good idea to go over the learning pathway multiple times. Now with an iPad and using the app Explain Everything, the students were able to take it even further by making an animated Math story to further consolidate their learning.

Here is that example:

I was very happy to see this example. This is the 3rd day that I have been working intensively with this grade level to get them settled into learning with the iPads. This for me is the first spark. If I can quickly get this kind of documenting happening across the whole grade level then I have met my first goal.

Going further ...

In the next lesson I plan to help all the other students who didn't yet get the opportunity to create their personal Math stories. What a fun and interesting way for students to consolidate their understanding about subtraction. In the meantime I can spread the enthusiasm with the other members of staff. The teachers are very active in the room every step of the way. iPads are new for them and it's exciting to see just how quickly we can get things to happen.

Once all the students have created a digital Math story, they will place these animations in the student's learning story journal. The student will write a small reflection about the process. What I need to consider is how the teacher can add some extra parts about the objective of the learning and also some feedback for the student without it causing too much of a hassle. The next step is to consider the data flow and how to make it easy and intuitive.

So glad to be back in this Tech Coach position. Today I'm also getting questions from other grade levels. It's paid off for me to be physically located just outside the classrooms. I expect that I will keep this model and just become the roving Tech Coach. I just wish that my bag of stuff wasn't so heavy!!

Goal Setting (for me)

In this grade level there are 6 classes of 1:1 iPads. My personal goals for Grade 2 the next few weeks are the following:

Iron out any issues with iPads, Apple TVs, apps and passwords
Get some real practice examples happening across the grade level in Math and Literacy
Data flow solutions
Seeing teachers asking for more practical examples of what the learning looks like, not what app to use :)


Monday, 5 May 2014

Published Books to the Apple iBooks Store

I wanted to share with you all my list of published books. I have created a List.ly to make it easier for people to access.

Friday, 4 April 2014

Technology in Chinese Lessons

I haven't written a blog post in quite some time. It's not that I haven't any content. I just don't have much time with my transition to a new school next academic year and a lot of demand for workshops :) I thought that I should share a recent workshop that I presented in Beijing. It is a collection of my tips for Chinese language teachers using iPads or Macbooks with their classes.


I am always careful to use creation apps on the iPad. There are some good content apps out there but you really need to look carefully as they often don't match with your curriculum needs.


Here we can see a teacher using a stylus to input Chinese characters. This allows for quicker typing of the characters. It is easy to set up via the keyboard options in your Macbook settings panel.


This is a very exciting way for students to write calligraphy on an iPad using an actual brush! You need a paint brush stylus. I have used the Sensu brush which feels so natural. I actually feel like I am writing calligraphy but there is no messy ink!


I really love the Drawing Pad app for iPad. I have been using it for several years now and it just keeps getting better. What a great way to make pictorial calligraphy to help learners remember their Chinese characters.

There are many Flash card apps for iPad. I like this one because you can draw right inside the app which is helpful for remembering Chinese characters. It is easy to make new sets and to share them across your classes. You can also download sets that others have made.


A few years ago I helped some Chinese teachers at my school to make Mr Bean movies with Chinese voice overs and Chinese character subtitles. It was so much fun. Here is a video made by a student. The learners gained so many new words from this project and had loads of fun!

me>

Here is the video that I made about Chinese books being creating using the Book Creator app for iPad. This lesson led to Keily Setiawan becoming the youngest child to ever publish an English/Chinese book to the Apple iBooks Store!!


Here is the link to the Apple iBooks Store for the book 'Chen Chen Goes to Space'.


Saturday, 12 October 2013

Part 1: Publishing eBooks with iPads - My Secrets

I have been publishing stories with children for many years. In the past I helped my students to build their stories using Keynote on the Macbook. Nowadays I prefer to work directly on an iPad. In this post I will cover the basics of working with children to create authentic stories based on personal experiences. I have developed a model that works with children from International schools to children from National schools in remote areas. 

Building relationships is a key factor


My own children love telling stories. 
My youngest son tells stories with style. He often tells stories about his own experiences in the third person. “John did this ... and then John said that.” He tells his stories with a mix between recounting what he did and what he said.

Authentic stories make strong connections with your readers


What's in a Book?


The Cover

The most important image in your book is the cover. This has to show what the story is about and needs to be clear and dynamic.

Take a look at this cover. You can easily see what the content of this book will be about. The image it clear and it stands out. The image tells about the content of the book.

When your book is on the iBookstore - you want it to stand out from the others. This will encourage people to click on it. This will help your book to be 'seen' and not fade into the many other books on display.


To create a stand-out cover, use contrast and white space properly. I apply the same principles that I would use in painting. Look at the strong diagonal created by the slope of the roof of this house. It leads your eye from the title down the middle of the cover - magic! Be wise when helping your students choose their book cover.

The Content

The model I use stays the same but it is important to realize that the teacher must build a relationship with the child. This is particularly important when working with students that are not in your regular classes as you need to take time to get to know your learner. I always start with the ‘why’ when working on developing a story. If the child can articulate why the story needs to be told, it will be much easier for them to create it. 


You will need an iPad for creating the book and Macbook to create the publishing package to send it to the iBookstore. You cannot directly send the book from the iPad.

When teaching story writing, the setting is often the first part of the story to be developed. If you listen to young children tell their stories orally, the setting is often bypassed in order to get to the action or conflict.

Children are spontaneous in the telling of their own stories. There is a real excitement there when sharing stories based on personal experiences. I believe that it’s because children can make deep connections to their stories, even to the point where they often want to reenact parts of the story for you. 


When children are then asked to write their story down in full that excitement often fades and the story becomes less spontaneous and more rigid. Sometimes children become disconnected and confused as to how to record their story. The events can often be written out of sequence as they try hard to remember what happened next. 

My approach is to encourage children to write about personal experiences that can be captured using an iPad. The iPad is perfect for capturing stories with it’s large screen and tactile surface. Children can quickly build their story and stay connected to it as it builds under their fingers. It could be a story about playing, catching a butterfly or even caring for a pet. It does need to be something that we can have access to so that the activity can be recorded as a series of photographs.


Once the main idea for the story has been decided upon, the sequence of events needs to be listed so that the children know what photographs are to be taken. I like to encourage the author to write down as brief notes which can be easily referred to. Don’t ask the child to write the whole story before they take the photos. This can lead to issues later such as the photos don’t match with the story. Just write down a rough idea with a sequence of events. 

Try to think of the story more as a storyboard and let the dialogue come later.


Writing down these notes on paper provides less distraction than using the iPad. This is important with children from remote areas. 

Keep it simple and don’t worry if they haven’t got the idea for a complete story. This can be developed later. I encourage the children to work backwards by writing the ending first. The ending can often be harder to find than the beginning.

The content of a story book is made up of a beginning, a middle and an ending. I always follow this format as it is what most children are familiar with. My model goes a little beyond that so it includes two more sections. There is an ‘About the Author’ section and a ‘Behind the Story’ section. This is to give more information to the reader so that this book can have more meaning for an international audience. It is essential that students are made aware that their books will be read by people from all over the world and that they need to tell their story in a way that everyone will understand. 


About the Author

The 'About the Author' section of the book is very important. How else will people realize that the author is a child? Using Book Creator it is very easy to create a book that looks very professional. If I didn't include an 'About the Author' section, people may not realize that the creator of the book is only 7 or 8 .... or even 5!


I also like to include a 'Behind the Story' section for project books such as the Backpack Classroom series and my current eBook project with deaf students. I want the readers to understand some of the background information behind each book. This is important so that the reader can make connections. It helps our readers to empathize with the story and what it represents.


Take a look at this book from the Backpack Classroom project.


Remember that you are writing for an International Audience ...
My Backpack Classroom books are being downloaded all over the world. Many children from the US are downloading these books and would not realize that the authors come from very modest means. The authors are rice famers children and don't have access to the same types of resources or even the same level of education that a child in the US has. Creating a 'Behind the Story' section can help your readers to understand these things better.

In my next post I will cover the process of creating the story and capturing the images for the book.