The two homeroom teachers both worked in different ways. One teacher preferred to work with one system at a time and have all students exploring that one system. The other teacher got the students to research a range of different body systems in small groups and then work together with that group to create a working demonstration to show their learning.

Tuesday, 7 May 2019
Human Body Systems Integration with Makerspace
I was so excited to work on a Science collaboration for the Makerspace with Grade 4. I persuaded 2 teachers to try a pilot with me using different technologies to create working body systems. We used Microbits, Ozobots, simple balloon pumps and mixed media to make the body systems come alive.
The two homeroom teachers both worked in different ways. One teacher preferred to work with one system at a time and have all students exploring that one system. The other teacher got the students to research a range of different body systems in small groups and then work together with that group to create a working demonstration to show their learning.
Both types were rich learning experiences for the students. I made a short Clips video of the different groups creating the body systems and preparing to share their work through a mini exhibition with other classes.
The two homeroom teachers both worked in different ways. One teacher preferred to work with one system at a time and have all students exploring that one system. The other teacher got the students to research a range of different body systems in small groups and then work together with that group to create a working demonstration to show their learning.
Tuesday, 29 January 2019
Spotlight and Workshops at Apple Leading Innovation Summit, Singapore 2019
Last week I presented a Spotlight and workshops at the Apple Leading Innovation Summit in Singapore. I was invited to present along with Hugo Indratno. Honestly we were both nervous as we prepared for our Spotlight presentation. As it turned out, that preparation was a rich experience for me personally.
I have presented regularly over the years. In the past I have even worked as an Apple Professional Developer. I have also presented two Spotlights at Apple Institutes previous to this occasion. What I enjoyed the most was getting critical feedback from the Apple people whilst I was on stage practicing for the event. I am always looking for ways to improve my skills. Having detailed feedback on how to present together with Hugo was such a learning experience. I learned to pace my speaking so that Hugo and I could take more natural turns to speak. I learned to look out to the audience to make that important contact with them. I also learned to make sure that all of the pieces of information about the 'how' in my presentation were clearly highlighted.
It can be hard to be self-critical. I am open to feedback as I am used to working with a diverse range of people at my school. As a coach you need to be really aware and sensitive to others around you.
As well as the Spotlight, Hugo and I also presented two hands on workshops. We were much more relaxed in those workshops as this is more of a comfort zone for both of us. We had teachers learning about developing that Maker Mindset through creating something that moves. We even brought with us a mini swimming pool to test out what the participants made. It was fun and our participants were reluctant to pack up at the end of the session.
I have presented regularly over the years. In the past I have even worked as an Apple Professional Developer. I have also presented two Spotlights at Apple Institutes previous to this occasion. What I enjoyed the most was getting critical feedback from the Apple people whilst I was on stage practicing for the event. I am always looking for ways to improve my skills. Having detailed feedback on how to present together with Hugo was such a learning experience. I learned to pace my speaking so that Hugo and I could take more natural turns to speak. I learned to look out to the audience to make that important contact with them. I also learned to make sure that all of the pieces of information about the 'how' in my presentation were clearly highlighted.
It can be hard to be self-critical. I am open to feedback as I am used to working with a diverse range of people at my school. As a coach you need to be really aware and sensitive to others around you.
Monday, 15 January 2018
New Makerspace in ES PIE
I have been an Apple Distinguished Educator for 10 years and it has provided such inspiration. To be connected with the amazing group of ADE educators has given me so much. I have presented a lot over the years on publishing but a few years ago I decided to challenge myself to try something new. To branch out and reinvent myself. It can be daunting to start again but I saw the potential for Maker Education and really wanted to be a part of this worldwide movement. At the time, my school had decided to develop an iTime program (Personal projects) with the help of Kath Murdoch as a consultant. I really wanted to be involved, but my job at that time was all about digital as I was a technology integration specialist. Many of my ADE peers in other schools were moving into this area but it took a while for me to follow as there was and is still so much work to be done in the digital area. I needed buy in from my school and although I could see all of the connections myself, but it took a while to grow those for others to recognise.
What I needed to do was make sure that I included digital literacy into every iTime session. Catering to as many as 20 diverse projects in each class can be overwhelming. Using our Apple devices with apps such as Book Creator and Seesaw has helped not only to grow learning dispositions but also to make the learning visible for others to see. Using iPads also gave students access to virtual mentors via videos. This effectively enabled me to help more students at the same time.

This is the first year that I have been a working in a big Makerspace that caters to the whole campus. It is very daunting! Previously, I have worked in a small room which was only able to fit 8 students at a time. The school renovated the library and as a part of that, a Makerspace was built on the second floor.

This year we opened the Makerspace doors to everyone and in that process, we needed to make sure that everyone was catered to. I am so grateful for the support of the homeroom teachers. I learn from these teachers every day as together we try to navigate the demand from our students.
Friday, 8 September 2017
On Being a Maker
I've been thinking a lot about the process that I use to make a project. There is a pathway of sorts that helps me to go from 'Something Imagined' to 'Something Real'. A big part of my making is in the planning. I don't just randomly make. That is not the way it happens. I can't work from zero.

I might see something online. Or I see it in passing or hear about something in conversation. That's all it takes. Just enough of a hint to light a spark.
The singularly most powerful inspiration for me is when I can see it directly and I can touch it. Something that engages more than one sense. I guess you could think of this as the front loading stage in an inquiry cycle. I need this stage or the spark for inspiration will not happen! After inspiration comes imagination.
 After making part of the project or all of the project the desire to improve it kicks in. This can make or break a project. Sometimes you can go too far in the pursuit to improve something and just end up ruining it. Yes that happens and yes those projects get tucked away never to see daylight again. I should embrace my failures or my projects that become 'over cooked'.
 Here is my cycle of making
I get inspired ...
I might see something online. Or I see it in passing or hear about something in conversation. That's all it takes. Just enough of a hint to light a spark.
The singularly most powerful inspiration for me is when I can see it directly and I can touch it. Something that engages more than one sense. I guess you could think of this as the front loading stage in an inquiry cycle. I need this stage or the spark for inspiration will not happen! After inspiration comes imagination.
I can spend a lot of time in this stage. Being inspired leads to dreaming about what I can make. Sometimes I will actually dream about it - or just daydream about it. Many, many times this will not lead to making anything but when I imagine something and think about it numerous times - that usually means that I need to take action. I never really copy - I hate to copy! I strive to make it my own. To make something copied could never be considered as a proper project. Only as a point of learning to learn a new skill.  The next stage is the planning stage. This can be done on my iPhone, via an online search, by taking photos and mixing them or by making a sketch. I need to see the project to get a clear idea of what it looks like. Whilst this is happening I usually research what it will be made of and how to acquire the tools and materials. Finally I find out what techniques are required. You Tube and Craftsy are my go-to options.
 Next comes the making stage. If the technique is a new one, I'll make a sampler. This helps me to know if I am smart enough to make the bigger project. At this stage my project might just lose steam if I am not able to actually make it. I am very ambitious and sometimes aim too high. Now I can begin the project. This is the best part. I can get totally lost in this part. Hours can pass and I don't even realise.
The next stage is the planning stage. This can be done on my iPhone, via an online search, by taking photos and mixing them or by making a sketch. I need to see the project to get a clear idea of what it looks like. Whilst this is happening I usually research what it will be made of and how to acquire the tools and materials. Finally I find out what techniques are required. You Tube and Craftsy are my go-to options.Next comes the making stage. If the technique is a new one, I'll make a sampler. This helps me to know if I am smart enough to make the bigger project. At this stage my project might just lose steam if I am not able to actually make it. I am very ambitious and sometimes aim too high. Now I can begin the project. This is the best part. I can get totally lost in this part. Hours can pass and I don't even realise. After making part of the project or all of the project the desire to improve it kicks in. This can make or break a project. Sometimes you can go too far in the pursuit to improve something and just end up ruining it. Yes that happens and yes those projects get tucked away never to see daylight again. I should embrace my failures or my projects that become 'over cooked'. Well that's something for me to work on ...
Of course I try to share about what I do. I mostly do that via my Instagram. This year I may even blog about it. I need to be quick though because I make stuff really fast.

Saturday, 26 August 2017
Starting Up a Makerspace - My Journey
This year I have the awesome opportunity to work in the JIS Elementary Makerspace. The room that will serve as the space is a corner office with lots of windows and light. Here is the room so far ...

There's not much in here yet but there are some robotics kits, Rigamijig, bike construction kits and other odds and ends. It's a start. So I find myself wondering ...What is a Makerspace? How can this space become accessible for all students at PIE? What can be done to get students really interested in making and collaborating in this space? What kinds of provocations can I create to help motivate students?
We have decided to call the space 'Bengkel'. Bengkel is the Indonesian word for workshop.

Something that I know well is, "People only know what they know and they don't know what they don't know." This is something that I have always told learners who are new to using technology - but actually it applies to all learning. So, how can you know what you don't already know?
How can I trigger a greater curiosity for making?
I am lucky to have a background in making. Back in the 80s I studied a Diploma of Art at the University of Southern Queensland before going on to train as a art teacher. I majored in Textiles and Painting. I have always been creative and have self-taught myself to make. My work in university really challenged me to understand the difference between art and craft. It was hard at times as I was trained to create art first but I was so influenced by Indonesian crafts as I had partly grown up in Indonesia. I really admire the craftspeople of Indonesia and had considered that to be a form of art. My lecturers told me that art is an expression and has message whereas craft is a skilled form and can be quantified. Craft can also be duplicated.
I know that the very concept of the maker movement is still being defined. If we start with what is a maker, we will find that it is a person who can create, produce, build, invent or manufacture something.

My understanding is that things made in a Makerspace are utilitarian. The things there are designed to be more practical rather than just attractive. Indeed startup companies like Quirky and Kickstarter are equipping makers with access to resources that can help turn an idea into a real life product. I strongly believe that making leads to new understandings and making new connections. An example of this is traditional weavers from Bolivia are being employed to make heart implants that cannot be produced by a machine.
How amazing that these traditional craftspeople are now weaving implants to save lives. It's their skill that cannot be reproduced by a machine. How creative was the Bolivian cardiologist Franz Freudenthal to make such a connection between craft and science.
So where do I begin? How can I turn this office space into a creation station? Over the past two years, my school has been developing an iTime program for all students in Elementary. A typical iTime cycle will run for about 6 weeks and happen about one session a week. Students create a pitch to their teacher which will include their plan for what they want to investigate, their needs (both materials and access to expertise) and how this will help them to become better learners. This Makerspace will support student iTime project work.
And so we begin. I hope to post frequently about how this space and this program develops. My first task is to buy some consumables. I already have students knocking on the door asking for DC motors, felt, wiring, sewing supplies etc.
I can hardly wait!
Wednesday, 15 March 2017
Scratch Jr - Coding with Junior Elementary Classes
I have been working with children in the younger grades on game creation. Scratch Jr is a fantastic app which is simple, yet it can produce a game with an ending screen.
Today I explored the app a little further to see if I could create a fan version of the popular Geometry Dash. Here is my game.


Today I explored the app a little further to see if I could create a fan version of the popular Geometry Dash. Here is my game.
I thought that I'd share it here for those looking to make a game that is not only popular but quite fun for younger students both the make and to play. You can even airdrop a finished game to another iPad to share with peers.


Tuesday, 20 September 2016
Accessibility for Young Learners
We have recently launched Easy Blog Schoolwide this year at JIS Elementary. I am so excited to get this moving. We trialled the app last year in Grade 1 and made the decision to roll out EYP to Grade 4 this academic year. Every child from EYP to Grade 4 now has their own Easy Blog. This is accessed via their iPad. I am a huge fan of the app that has been developed by a group of teachers at the Western Academy of Beijing.
The best part of Easy Blog is that it is visual and very simple to use and it doesn't take up very much time to make a post. Students can post as they are learning. Parents are connected and will get to see learning in real time as it is happening. Parents get a notification each time there is a new post added. They can easily view the blog on their smartphone. This makes it possible for the parent to see their child's learning anywhere, anytime. Over the last couple of weeks, classes have started blogging. The students have been making their first post and creating an avatar for their profile.


What is really interesting is how the accessibility settings in an iPad can open up so much for young learners and for those needing support as new learners to English. The students are able to add a keyboard in their iPad for their mother tongue. This means that they can dictate and the iPad will type in their language. Being able to work like this in two languages helps learners make important connections. As young learners often struggle with typing, the dictation offers them a way to type quickly and to practice reading back what has just been typed by the iPad to check for errors. This also means that when parents comment in their mother tongue on blog posts, the child can respond in their mother tongue too.
The iPad is able to read aloud comments in different languages, but it does take a bit of setting up. A simpler way for young students to hear comments read aloud in languages other than English, is to capture with another device (their friend's iPad) and let Google Translate read the comment. Once you have used the Google Translate app a couple of times, it becomes more fluent and can translate even faster.
Here is a screenshot of Google Translate capturing the text from a screen. I tap the photo button and take a photo. Then I highlight the Japanese text with my finger to get Google to translate it.


The best part of Easy Blog is that it is visual and very simple to use and it doesn't take up very much time to make a post. Students can post as they are learning. Parents are connected and will get to see learning in real time as it is happening. Parents get a notification each time there is a new post added. They can easily view the blog on their smartphone. This makes it possible for the parent to see their child's learning anywhere, anytime. Over the last couple of weeks, classes have started blogging. The students have been making their first post and creating an avatar for their profile.

Example avatars from a young class made with the Drawing Pad app

Example avatars from an older class made with AvatarMaker.com
What is really interesting is how the accessibility settings in an iPad can open up so much for young learners and for those needing support as new learners to English. The students are able to add a keyboard in their iPad for their mother tongue. This means that they can dictate and the iPad will type in their language. Being able to work like this in two languages helps learners make important connections. As young learners often struggle with typing, the dictation offers them a way to type quickly and to practice reading back what has just been typed by the iPad to check for errors. This also means that when parents comment in their mother tongue on blog posts, the child can respond in their mother tongue too.
The iPad is able to read aloud comments in different languages, but it does take a bit of setting up. A simpler way for young students to hear comments read aloud in languages other than English, is to capture with another device (their friend's iPad) and let Google Translate read the comment. Once you have used the Google Translate app a couple of times, it becomes more fluent and can translate even faster.
Here is a screenshot of Google Translate capturing the text from a screen. I tap the photo button and take a photo. Then I highlight the Japanese text with my finger to get Google to translate it.

Next, I tap the blue arrow to bring it to this screen where I get a sound button to read the comment aloud in Japanese allowing the young child to hear what has been written. This is so exciting and so accessible. I can't wait to see it develop across the school. Today already I am watching comments being posted from parents in different languages.

Thursday, 18 August 2016
Dictation on the iPad with Book Creator
Book Creator is one of my go-to apps on the school iPads. I work at an international school with students from all over the world. A great accessibility feature of iPads is the dictation feature in the keyboard.
I have used dictation in Book Creator as a way for young learners to be able to get their thoughts typed up more efficiently. I find it really helpful for young learners to be able to speak aloud their sentences and see them being typed up by the iPad.
Well, did you know that this in-built feature works for languages other than English? In the screenshot below I have used the Indonesian keyboard to access dictation in Indonesian. It works so well! What a fantastic way for students to practice pronunciation. Go on try it now with a language that you can speak ...
Go to Settings - General - Keyboard

Choose any keyboards you wish to make available.
Now open Book Creator. When you want to dictate, select 'Add Text' from the plus menu.

When you dictate - click the world icon on the bottom left of the spacebar and select your language. Press the microphone icon and speak your sentence. It's works best if you only dictate short sentences with either a hands free microphone or work in a quiet space.

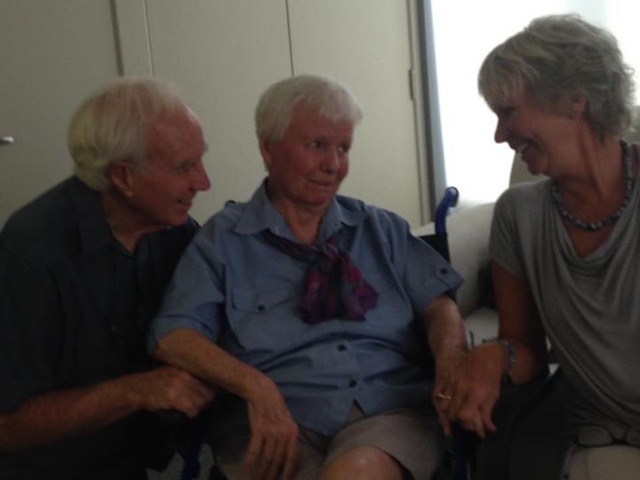
Sunday, 17 April 2016
The Little iPod
My mum suffers from advanced Alzheimer's. She was diagnosed 7 years ago at the age of 80 as the result of a routine memory test with our family doctor. My dad has been looking after her and was her carer until about 3 months ago when she lost her mobility and needed to be moved into a care facility. This was indeed a hard time for all of us. My parents have been together for 68 years.
I live in Jakarta with my family. I have two older sisters and they live far away with one in country NSW and the other in Far North Queensland. We rarely see each other. My parents live on the Sunshine Coast.
I am able to visit each year with my parents and during the 2015 visit my mum was still mobile and talkative. My recent visit revealed to me just how much this disease has progressed.

My mum is healthy and seems happy but seeing her in a wheelchair was a big shock. My daughter came along for this visit and we stayed with my dad who lives in a retirement apartment in the same complex. We were able to visit my mum each day. I am indeed grateful that mum is in a caring place with wonderful nurses and a very homey invironment.
It doesn't quite prepare you for the reality of the disease.
At each visit I would sit and try to communicate with mum and at times I would see a glimpse under the fatigue of dementia and for a fleeting moment see my mum.
It was a far cry from our last visit when she was still walking and talking.
My dad is active and healthy. He drives, he cooks and he keeps busy as an active member of his community.
Recently on TV there was a documentary called 'Music on the Brain'. http://youtu.be/oGmfPGg4hGQ
My dad showed it to me and asked if we could try out the music therapy that the program was advocating.
We went out and bought an iPod Shuffle and some comfortable headphones that would block out background noise.
I showed my dad how to create a playlist of my mum's favourite songs and how to transfer that to the iPod. My dad got a whole bunch of songs, many from the 1940s, the time when they were first dating and would go out dancing at dance halls such as Cloudland in Brisbane.
We were so excited about this little iPod but I must admit I was a bit sceptical as to how well it would work. I was worried it would be disappointing.
We weren't disappointed.
The moment I placed it on my mum's ears her expression changed. She became animated and started to move her hands. We were so curious about which song she was listening to. Then the song changed and she got a bit teary but still moved and was clearly enjoying the music. At times she would try to stand up or hold her hands together like in prayer.
I did not expect this to work so well.
We talked to her nurses and made an arrangement for mum to listen to her iPod for an hour each day.
A week later my sister who lives in Port Douglas was able to stop in for a visit. She shared with me some photos from her visit when mum was really communicative and active for over an hour.
We believe that the music is helping my mum. She is not active every day but changes are happening. It's like the music is enabling my mum to reconnect.
I hope that by sharing this story it will help others. I also want to thank all the teachers out there that sing with their classes. You are creating memories and developing a love for music with your students. These powerful memories are so important not just now but in the future.
Wednesday, 16 March 2016
Vibrobots - Simple Robots that Move for a Maker Activity
Last Saturday I led some workshops at the Association of National Plus Schools annual teacher's conference in Jakarta. My workshop was all about Makerspace and Capturing the Learning in Real Time.
I used the term Makerspace in the perspective that it is a place where you can make something which could be really anywhere. I have always employed Maker activities in my classroom. I wanted to share about how making can unlock understandings in a way that viewing pictures or videos can't.
For this workshop we made a simple electric robot from recycled materials. I am really interested in robotics but I am even more interested in the mechanics and trying to understand how things work and why they work. These are abstract concepts but even young students can understand them when they get the chance to make it with their hands.
We started with the basic equipment:
a plastic cup
3 marker pens
two electrical wires with the ends stripped
a AA battery
a DC motor
electrical tape
sticky tape
 About DC motors:
You can find DC motors inside many household items such as electric toothbrushes, battery operated fans or mixers. Here is an example of a motor inside a mixer.


Step 1:
Tape the markers to the plastic cup.
Step 2:
Make sure that the three markers are firmly attached with sticky tape. Put the markers facing downwards so that your robot can draw.
Step 3:
Prepare 2 copper wires by stripping (removing) the plastic from each end.
Step 4:
Connect one wire on each side of the motor. Thread the metal through the loop and twist to secure. Add a small weight to offset the motor shaft. This is to make the motor vibrate.
Step 5:
Tape the battery on the top of the cup. Tape the motor so that the spinning shaft is off the edge of the cup.
Step 6:
Using small pieces of electrical tape, tape on wire to the positive 'bump' end of the battery and one wire to the flat negative end. Using electrical tape is great because you can pull one end on and off to act as a switch.
Step 7:
Pull off the marker pen caps and place your robot on some paper. Watch it draw.
#Troubleshooting - Be aware that your circuit must be well connected or the motor won't run. Sometimes cheap DC motors can be faulty and you may have one that just doesn't work. Recheck your wiring too.
Make sure that your learners document the process with photographs and or video. Consider the 'Split Screen Learning Intentions' and focus on not just what you are learning but also how you are learning.

I used the term Makerspace in the perspective that it is a place where you can make something which could be really anywhere. I have always employed Maker activities in my classroom. I wanted to share about how making can unlock understandings in a way that viewing pictures or videos can't.
For this workshop we made a simple electric robot from recycled materials. I am really interested in robotics but I am even more interested in the mechanics and trying to understand how things work and why they work. These are abstract concepts but even young students can understand them when they get the chance to make it with their hands.
We started with the basic equipment:
a plastic cup
3 marker pens
two electrical wires with the ends stripped
a AA battery
a DC motor
electrical tape
sticky tape

You can find DC motors inside many household items such as electric toothbrushes, battery operated fans or mixers. Here is an example of a motor inside a mixer.


Step 1:
Tape the markers to the plastic cup.
Step 2:
Make sure that the three markers are firmly attached with sticky tape. Put the markers facing downwards so that your robot can draw.
Step 3:
Prepare 2 copper wires by stripping (removing) the plastic from each end.
Step 4:
Connect one wire on each side of the motor. Thread the metal through the loop and twist to secure. Add a small weight to offset the motor shaft. This is to make the motor vibrate.
Step 5:
Tape the battery on the top of the cup. Tape the motor so that the spinning shaft is off the edge of the cup.
Step 6:
Using small pieces of electrical tape, tape on wire to the positive 'bump' end of the battery and one wire to the flat negative end. Using electrical tape is great because you can pull one end on and off to act as a switch.
Step 7:
Pull off the marker pen caps and place your robot on some paper. Watch it draw.
#Troubleshooting - Be aware that your circuit must be well connected or the motor won't run. Sometimes cheap DC motors can be faulty and you may have one that just doesn't work. Recheck your wiring too.
Make sure that your learners document the process with photographs and or video. Consider the 'Split Screen Learning Intentions' and focus on not just what you are learning but also how you are learning.

Extension Activities:
Try placing the battery on the centre of the cup end with the motor on top. Does this change the patterns that your robot is drawing? Try other combinations. Try using a different weight to offset the motor. Can you measure how these changes affect the drawing that your robot does? Consider how this activity can help your students understand about circuits and motion. Take some video and compare the differences. Identify how small changes affect the way your robot moves and draws.
Subscribe to:
Posts (Atom)