Showing posts with label self publishing. Show all posts

Tuesday, 1 June 2021

School Yearbook - Reimagined and Published Online with Book Creator

This year, I was given the task to coordinate and produce the annual yearbook. Traditionally, the yearbook was coordinated by a group of teachers and the layouts were produced by an organisation outside of the school. The book itself was a traditional heavy hardbound paper format that featured school events and those formal galleries of student photos in passport-style format. Given that our learning this year has been online, it was a logical choice to create an online digital yearbook. 

I chose to use online Book Creator as this app is widely used by our students, can be accessed via any device and importantly can accomodate a wide range of multimedia. I also really wanted to make this yearbook more environmentally friendly. There are cupboards full of old yearbooks at school which will probably never be used. Using Book Creator online had meant that our whole school community has easy access to the book and all those school event highlight videos could be included directly in the book. 

My process began by pitching layout ideas first to our school management and then later to all teachers at a weekly staff meeting. The biggest challenge was finding enough good quality photos of students engaged in their learning. This was because we had been learning online this year due to the pandemic. Photos taken via Zoom were not clear enough we needed help from our parents to send in photos of learning in action. It was a mammoth task to make sure that every child from Early Years to our eldest grade level was well represented.

I was keen to break away from the traditional headshot passport photo galleries that were a feature of every yearbook in the past. I have always found them to be too formal and they don't capture the personality of the individual.  I started by creating a collection of ideas in which classes could be collaged together with fun themes for each grade level. Some examples of these were garden scapes, superheroes, a rainy day and 'What's your passion?'. As we had been transitioning into blended learning, I was able to photograph some students who attended school social pods using a green screen and the students who weren't able to come to campus sent in a head-to-toe photograph in front of a plain background. Each of these photos had the backgrounds removed so they could be layered together as a class.


We decided to keep masks on for these class photos to capture this unique school year. I used photoshop and the website www.remove.bg to remove the backgrounds and then layered the photos together in Canva which is an online app that allows editing layers of photos to create a digital collage.


Once the class layouts were made, it was easy to upload them to Book Creator. In Book Creator online, I added photos of online learning for each class and specialist subject area, special school events and even embedded videos. To make the yearbook more accessible, I included a Table of Contents to hyperlink to each section of the book and a back button on each page to allow a quick return to the Table of Contents. The finished book has over 215 pages and will soon be embedded on our school website. 


To cater to those individuals that really wanted a printed copy, I also made the PDF version available for printing on a photocopier. Here is a sneak peek at that hard copy version.  


Saturday, 12 October 2013

Part 1: Publishing eBooks with iPads - My Secrets

I have been publishing stories with children for many years. In the past I helped my students to build their stories using Keynote on the Macbook. Nowadays I prefer to work directly on an iPad. In this post I will cover the basics of working with children to create authentic stories based on personal experiences. I have developed a model that works with children from International schools to children from National schools in remote areas. 

Building relationships is a key factor


My own children love telling stories. 
My youngest son tells stories with style. He often tells stories about his own experiences in the third person. “John did this ... and then John said that.” He tells his stories with a mix between recounting what he did and what he said.

Authentic stories make strong connections with your readers


What's in a Book?


The Cover

The most important image in your book is the cover. This has to show what the story is about and needs to be clear and dynamic.

Take a look at this cover. You can easily see what the content of this book will be about. The image it clear and it stands out. The image tells about the content of the book.

When your book is on the iBookstore - you want it to stand out from the others. This will encourage people to click on it. This will help your book to be 'seen' and not fade into the many other books on display.


To create a stand-out cover, use contrast and white space properly. I apply the same principles that I would use in painting. Look at the strong diagonal created by the slope of the roof of this house. It leads your eye from the title down the middle of the cover - magic! Be wise when helping your students choose their book cover.

The Content

The model I use stays the same but it is important to realize that the teacher must build a relationship with the child. This is particularly important when working with students that are not in your regular classes as you need to take time to get to know your learner. I always start with the ‘why’ when working on developing a story. If the child can articulate why the story needs to be told, it will be much easier for them to create it. 


You will need an iPad for creating the book and Macbook to create the publishing package to send it to the iBookstore. You cannot directly send the book from the iPad.

When teaching story writing, the setting is often the first part of the story to be developed. If you listen to young children tell their stories orally, the setting is often bypassed in order to get to the action or conflict.

Children are spontaneous in the telling of their own stories. There is a real excitement there when sharing stories based on personal experiences. I believe that it’s because children can make deep connections to their stories, even to the point where they often want to reenact parts of the story for you. 


When children are then asked to write their story down in full that excitement often fades and the story becomes less spontaneous and more rigid. Sometimes children become disconnected and confused as to how to record their story. The events can often be written out of sequence as they try hard to remember what happened next. 

My approach is to encourage children to write about personal experiences that can be captured using an iPad. The iPad is perfect for capturing stories with it’s large screen and tactile surface. Children can quickly build their story and stay connected to it as it builds under their fingers. It could be a story about playing, catching a butterfly or even caring for a pet. It does need to be something that we can have access to so that the activity can be recorded as a series of photographs.


Once the main idea for the story has been decided upon, the sequence of events needs to be listed so that the children know what photographs are to be taken. I like to encourage the author to write down as brief notes which can be easily referred to. Don’t ask the child to write the whole story before they take the photos. This can lead to issues later such as the photos don’t match with the story. Just write down a rough idea with a sequence of events. 

Try to think of the story more as a storyboard and let the dialogue come later.


Writing down these notes on paper provides less distraction than using the iPad. This is important with children from remote areas. 

Keep it simple and don’t worry if they haven’t got the idea for a complete story. This can be developed later. I encourage the children to work backwards by writing the ending first. The ending can often be harder to find than the beginning.

The content of a story book is made up of a beginning, a middle and an ending. I always follow this format as it is what most children are familiar with. My model goes a little beyond that so it includes two more sections. There is an ‘About the Author’ section and a ‘Behind the Story’ section. This is to give more information to the reader so that this book can have more meaning for an international audience. It is essential that students are made aware that their books will be read by people from all over the world and that they need to tell their story in a way that everyone will understand. 


About the Author

The 'About the Author' section of the book is very important. How else will people realize that the author is a child? Using Book Creator it is very easy to create a book that looks very professional. If I didn't include an 'About the Author' section, people may not realize that the creator of the book is only 7 or 8 .... or even 5!


I also like to include a 'Behind the Story' section for project books such as the Backpack Classroom series and my current eBook project with deaf students. I want the readers to understand some of the background information behind each book. This is important so that the reader can make connections. It helps our readers to empathize with the story and what it represents.


Take a look at this book from the Backpack Classroom project.


Remember that you are writing for an International Audience ...
My Backpack Classroom books are being downloaded all over the world. Many children from the US are downloading these books and would not realize that the authors come from very modest means. The authors are rice famers children and don't have access to the same types of resources or even the same level of education that a child in the US has. Creating a 'Behind the Story' section can help your readers to understand these things better.

In my next post I will cover the process of creating the story and capturing the images for the book.

Friday, 15 June 2012

Create - Publish - iBookstore

How can teachers support students to create books and publish them?

Yesterday I helped to upload the 9th book from SWA to the iBookstore. This book was created by my own daughter so I can explain each step here for those of you who may wish to publish a book.

You can download the book here for free. It is called 'Catch a Dragonfly' http://itunes.apple.com/us/book/catch-a-dragonfly/id536106960?mt=11 


1. Choosing an idea. 

This seems simple enough yet it can be the hardest part of the process. Luli, my daughter loves nature and we were chatting about when she first learned how to catch a dragonfly. Luli is a very caring girl and only likes to catch the dragonflies to take a closer look. She then releases them again to fly away free.

We chatted about how she could turn this into a story book.

2. Making the book. 

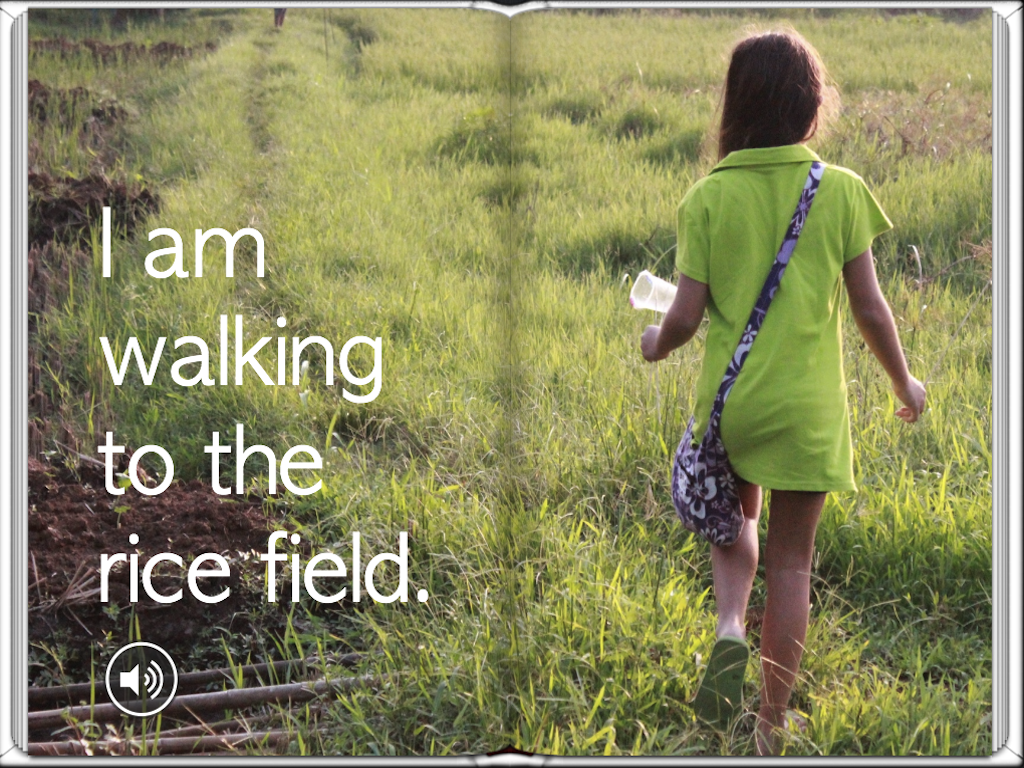
When making a book with children, it's best to keep it simple. Luli and I went for a drive to find a rice field. We found a few but we needed the rice plants to be tall and almost ready for harvest. This is what attracts the dragonflies. We also needed to go late in the day when it is cooler.

I asked Luli to think about what needed to be included in the book. I took the photos so that Luli could concentrate on the story.

3. Choosing the photos. 

I downloaded all the pictures onto my Macbook and Luli chose which ones she wanted to include to tell the story. She then put them into order and we imported them onto my iPad. It is very easy to create picture books directly on the iPad. This allows children to focus more on the story because learning to use the App only takes a few minutes.

4. Book Creator App  

http://itunes.apple.com/us/app/book-creator-for-ipad/id442378070?mt=8
We used the Book Creator app for iPad to make the story. I really like the professional finish that Book Creator produces. Luli was easily able to insert all the pictures into the book and type in the text to go with each page. We decided to use a lot of double page images to really show off the photos.


5. Previewing the book. 

Book Creator allows for an easy preview in the iBooks free app. You just tap the export to iBooks button which automatically opens the iBooks app and opens your new book. After previewing her book, Luli was able to change the order of some of the pages and then preview again by clicking export to iBooks.

6. Recording the book reading.

Luli wanted to include a recording on each page of her reading the book. This is so that her book can be more accessible for younger readers. She did this easily using the Book Creator app by separately recording each page. She was careful to read slowly and clearly.

7. Exporting the finished book.

When the story was complete. Luli added one last page 'About the Author'. I insist on all my students including a page about the author. I think that it is important for the reader to know who wrote the book.


8. Uploading to iTunes

To upload the book to the iBookstore, you need to have the parent create an iTunes account (with a credit card on file) and then an iTunes Connect account. To create a Paid account you need many things such as a US Tax file number, ISBN for each book and also complete tax requirements for the country in which you reside. For students I recommend creating a Free account as it is instant and the iBookstore supply each ISBN for free.

If the child is under age, the parent must be the one creating these accounts as the parent will become the publisher for the child. 

Once the account has been created, any subsequent books can be easily published via that same account.
I had already created an iTunes Connect, so it was easy for me to upload this book to my account.

9. Creating the Publishing Package

It is important to read the instructions that are inside the iTunes Connect account as to what requirements are necessary for your book. There is a limit on images used for publishing to the iBookstore. Each image must be less than 2 million pixels. I needed to reduce the size of all of the photos for Luli's book as I had taken them with a DSLR and they were 10 MB each. To do that you can open each photo on your Macbook using Preview and in the Tools section reduce the size for each image.

In the publishing package you will need to include a category for your book, title, description and target audience. You will also need the exported ePub file, cover image and some sample pages. The sample pages must be 1024 X 768 pixels which is easy enough to re size using Preview on a Mac.

10. Publishing

The iBookstore will run several checks on your book. In my experience, if the images are under 2 million pixels, there is little more to worry about as Book Creator produces a file that is standards compliant with the iBookstore requirements. The iBookstore does check the content which can mean delays in publishing. My daughters book that I uploaded yesterday at 6pm was published only 6 hours later! This depends on your content. Not all books are released that quickly. Some books produced by my students have taken as long as 6 weeks to publish.

Good luck to you who wish to publish. My daughter is so happy today. She is already planning book 2!!